FAQ
Here you can find a list of frequently asked questions about JUSUF:
General FAQ
How to generate and upload ssh keys?
In order to access the JSC computer systems you need to generate a SSH key pair. This pair consists of a public and a private part.
Please follow the following links to the system specifc support pages to receive information how to generate your SSH key pair and how to manage your SSH connections in general:
My job failed with “Transport retry count exceeded”
Ocassionally, a job might fail with a message like ib_mlx5_log.c:145 Transport retry count exceeded on mlx5_1:1/IB (synd 0x15 vend 0x81 hw_synd 0/0). What this means is that the network adapter has been trying to successfully transmit a package, but has failed to do so. The reasons can be various:
Fabric congestion. Unfortunately, under some circumstances the fabric might become temporarily congested, forcing the adapters to retransmit. If the congestion lasts long enough, the maximum number of retries might be reached. At that point, the application will crash with the mentioned error.
Fabric changes. Big changes in the fabric (like removing racks from production to be serviced) temporarily affect the routing tables of all switches in the fabric. If your packages are being transmited by links that are affected by this modifications, there is a slight chance that the maximum number of retries is reached, and that the application crashes.
Hardware failure. InfiniBand adapters and InfiniBand Switches fail occasionally. That might disconnect the endpoints, at which point package transmision to/from that endpoint is no longer possible.
Missmanagement of asynchronous communication. This is the rarest of the possible causes. However, we have observed at least one code that had hundreds of simultaneous in-flight transmissions, and was particularly prone to fail with this message. Adjusting the number of active MPI calls made the problem dissapear.
In most cases, you simply should resubmit your job. If the issue is recurrent, there is a chance that your code is particularly sensitive to this situation. UCX_RC_TIMEOUT is a variable that adjusts the time between retries and hence can help to reduce the chances of running into that failure. The default value can be checked with ucx_info -f. If that does not help, please consider using other transports (UD, DC). See MPI runtimes for more information on how to configure MPI and UCX via software modules.
My job failed/was killed for no apparent reason
Assuming that your job did not reach its time limit, one possible cause is a node that experienced some issue. Some failures (especially due to excessive memory consumption) are captured in the end of the job report, so make sure to check the job report for the affected job.
In other cases the job report is not able to capture the hardware failure. In that case you can query the state of the node list on your job to look for hints. To do that you can type sinfo -n $(sacct -j <your_job_id> -o nodelist -P | sed -n 2p) --list-reasons --long. That will list the current state of the involved nodes, if they are not available for usage. It is possible that the node was temporarily drained due to a transient error, or that the node has been repaired in the meantime. In that case the list will be empty.
How can a compute node in an active allocation be accessed?
Sometimes it can be useful to log directly into a compute node of a running job. Compute nodes can be accessed with the sgoto command:
sgoto <jobid> <node>
which will log in to the compute node <node> of the job <jobid>. The node count starts from 0.
Estimating Power and Energy Usage of a Job
Power and Energy measurements can be obtained via Slurm or the job reports in LLview, showing consolidated values collected from various sources. Details about how to obtain the values and their meaning are described below.
Warning
The power data are obtained from different sensors, with an intrinsic maximum error of 4.5%. Note also that the sampling frequency is low.
Power Measurements
Snapshots of the power drawn on a node in Watt (“Node Power”) are shown as “CurrentWatts” by Slurm using the command scontrol show node <nodeid>.
The displayed values are updated every minute. LLview collects these values every minute and includes them in the job reports, making them easily available to users.
The “Node Power” measurements contain power drawn by the CPU, memory, GPU, network cards, and peripherals attached to the node. Not included in these power measurements are the network infrastructure (e.g., cables and switches), general infrastructure (e.g. cooling, electrical systems), eventual loss into heat, and naturally embodied energy (e.g. the energy spent to build components and install the system).
Separate power measurements for the NVIDIA GPUs can be obtained via nvidia-smi or other NVIDIA API calls, and they are also collected and displayed by LLview. Other higher-level tools can measure power and energy more fine-granular and with higher frequency, like JSC’s jpwr.
Energy Measurements
The consumed energy of a job can be obtained either by sstat <jobid> -P -a -o JobID,ConsumedEnergy (while the job is running) or by sacct -j <jobid> -o JobID,ConsumedEnergy (after the job is finished).
The sacct command shows an entry for the job (<jobid>), an entry for the batch part of the job (<jobid>.batch, accounting for the submission script) and then one entry per step/srun (<jobid>.0, <jobid>.1, <jobid>.2, etc.). Values for ConsumedEnergy are given only for the steps.
Warning
There is currently a problem on how the values for the total energy estimation of a job is calculated (displayed on the first line of the output from the sacct command above, for example).
Slurm adds up the energy values for each of the job steps, which are calculated independently from the total power of the node.
When a job has multiple steps running in parallel on the same node(s) (e.g., CPU and GPU), this calculation takes into account the energy for the same components multiple times.
For jobs that have a single job step, steps running sequentially, or running on separate nodes, the total estimation should be valid.
The energy values are obtained by integrating the node power snapshots that are updated every 30s over the time inbetween snapshots.
The values that are shown in the sstat command are updated in the order of seconds, but the integration is done using the power values that are updated only every 30s.
The energy values are obtained by summing over all nodes and integrating since the start of the job.
Units are in W*s=J.
FAQ about Data Management
How to access largedata on a limited number of computes within your jobs?
On each system there are 10 nodes inside the default batch partition where XCST storage resources ($DATA) can be accessed.
This is an example on how to get access to it within your jobs:
#!/bin/bash
#SBATCH --nodes=1
#SBATCH --time=00:10:00
#SBATCH --constraint=largedata

srun ./my-prog
What file system to use for different data?
In multiple GPFS file systems for different types of user data. Each file system has its own data policies.
$HOME
Acts as repository for the user’s personal data like the SSH key. There is a separate HOME folder for each HPC system and a shared folder which points to the same directory on all systems except JUPITER. Data within $HOME are backed up by ISP, see also
$SCRATCH
Is bound to a compute project and acts as a temporary storage location with high I/O bandwidth. If the application is able to handle large files and I/O demands,
$SCRATCHis the right file system to place them. Data within$SCRATCHis not backed up and daily cleanup is done.Normal files older than 90 days will be purged automatically. In practice, both the modification and the access date are taken into account, but for performance reasons the access date is not set automatically by the system but can be set by the user explicitly with
touch -a <filename>.
Time stamps that are recorded with files can be easily listed by
stat <filename>.
Empty directories, as they will arise amongst others due to deletion of old files, will be deleted after 3 days. This applies also to trees of empty directories which will be deleted recursively from bottom to top in one step.
$LOCALSCRATCH
On JUSUF there is a node local disk available, accessible via a specific directory. All users do have access to this directory, temporarily for the runtime of their jobs.
Data within
$LOCALSCRATCHis not backed up and cleaned up after every compute job.$LOCALSCRATCH=”/local/nvme”
nodes: all cluster compute nodes
usable size: >800GB
Type: 1TB NVMe disk
$PROJECT
Data repository for a compute project. It’s lifetime is bound to the project lifetime. Data are backed up by ISP.
$DATA
Belongs to a data project. This file system is designed to store a huge amount of data on disk based storage. The bandwidth is moderate. The file-system internal backup is realized with the GPFS snapshot feature. In addition the data is backed up by ISP on a weekly base. For more information, look at
$LARGEDATA
Belongs to a data project. The storage cluster which is storing the data is deprecated. In H2/2026 it will be migrated to
$DATA. The file-system internal backup is realized with the GPFS snapshot feature. In addition the data is backed up by ISP on a weekly base. For more information, look at
$ARCHIVE
Is bound to a data project and acts as storage for all files not in use for a longer time. Data are migrated to tape storage by ISP-HSM. It is recommended to use tar files with a minimum size of multiple Gigabytes and a maximum of 8 TB. The background is that recalling/restoring files from tape is much more efficient using only a few large datastreams than thousands of small data streams.
All GPFS file systems are managed by quotas for disk space and/or number of files. See also
What data quotas do exist and how to list usage?
For all data repositories the disk quota managing is enabled. The values are set to default values (defined by JSC) or depend on special requirements by the projects.
File System |
Disk Space |
Number of Files |
||
|---|---|---|---|---|
Soft Limit |
Hard Limit |
Soft Limit |
Hard Limit |
|
$HOME $JUSTHOME |
20 GB |
22 GB |
80.000 |
82.000 |
$SCRATCH $JUSTHOME |
90 TB |
95 TB |
4 Mio |
4.4 Mio |
$PROJECT $JUSTPROJECT |
15 TB |
17TB |
3 Mio |
3.3 Mio |
$DATA $JUSTDATA |
as granted to project |
soft limit
+ up to 10% additional
|
as granted to project |
soft limit
+ up to 10% additional
|
$LARGEDATA |
as granted to project |
soft limit
+ up to 10% additional
|
as granted to project |
soft limit
+ up to 10% additional
|
$ARCHIVE $JUSTARCHIVE |
as granted to project |
soft limit
+ up to 10% additional
|
as granted to project |
soft limit
+ up to 10% additional
|
File size limit
Although the file size limit on operation system level e.g. at JUPITER, JUWELS or JURECA is set to unlimited (ulimit -f) the maximum file size can only be the GPFS group quota limit for the corresponding file system. The actual limits can be listed by jutil.
List data quota and usage by project or user
Members of a group/project can display the hard limits, quotas (soft limit) and usage by each user of the project using the
jutil command.
jutil project dataquota -p <project name>
The quota information for the users are updated every 8 hours.
Recommendation for users with a lot of small files
Users with applications that create a lot of relatively small files should reorganize the data by collecting these files within tar-archives using the
tar -cvf archive-filename ...
command. The problem is really the number of files (inodes) that have to be managed by the underlying operating system and not the space they occupy in total. On the other hand please keep in mind the recommendations under File size limit.
How to compare and transfer large datasets
rsync is preferred by many communities in most cases. The main reasoning is that it does not
transfer data that has already been transferred before. It also allows to resume the transfer when
interrupted. The downside is its lack of parallelism.
Note
Beside transferring data users want to check or run metadata operations on their datasets. Therefore the MPI-based tool mpifileutils is available on all HPC systems.
mpifileutils CLIs (subset)
dcp - Copy files.
drm - Remove files.
dchmod - Change owner, group, and permissions on files.
dcmp - Compare contents between directories or files.
dsync - Synchronize source and destination directories or files.
ddup - Find duplicate files.
The documentation offers the following overall tips (Adjusted for our use-case):
Run the tools within a job allocation (2-4 nodes).
Use most CPU cores on each node by adjusting
--tasks-per-node.Request sufficient time in your allocation to allow the job to complete.
Inspect stdout and stderr output for errors.
Example: compare content of two directories
$ srun --nodes=1 --ntasks=120 dcmp \
        -o CONTENT=DIFFER:dcmp_differ_file.out \
        -o CONTENT=COMMON:dcmp_common_file.out \
        -o EXIST=ONLY_SRC:dcmp_onlysrc_file.out \
        -o EXIST=ONLY_DEST:dcmp_onlydest_file.out \
        --text --progress 1 dummy_files/ $FASTDATA_project/user1/dummy_files/
[2024-02-02T17:15:10] Walking source path
[2024-02-02T17:15:10] Walking /p/largedata/project/user1/dummy_files
[2024-02-02T17:15:11] Walked 20746 items in 0.408 secs (50792.286 items/sec) ...
[2024-02-02T17:15:11] Walked 20746 items in 0.410 seconds (50581.193 items/sec)
[2024-02-02T17:15:11] Walking destination path
[2024-02-02T17:15:11] Walking /p/fastdata/project/user1/dummy_files
[2024-02-02T17:15:11] Walked 9403 items in 0.166 secs (56753.740 items/sec) ...
[2024-02-02T17:15:11] Walked 9403 items in 0.166 seconds (56683.154 items/sec)
[2024-02-02T17:15:11] Comparing items
[2024-02-02T17:15:11] Comparing file contents
[2024-02-02T17:15:13] Compared 6.755 GiB (7%) in 2.505 secs (2.696 GiB/s) 33 secs left ...
[2024-02-02T17:15:16] Compared 14.923 GiB (16%) in 4.799 secs (3.110 GiB/s) 26 secs left ...
[2024-02-02T17:15:18] Compared 24.874 GiB (26%) in 7.115 secs (3.496 GiB/s) 20 secs left ...
[2024-02-02T17:15:21] Compared 35.748 GiB (38%) in 10.065 secs (3.552 GiB/s) 17 secs left ...
[2024-02-02T17:15:24] Compared 50.331 GiB (53%) in 13.318 secs (3.779 GiB/s) 12 secs left ...
[2024-02-02T17:15:26] Compared 63.272 GiB (67%) in 15.423 secs (4.102 GiB/s) 8 secs left ...
[2024-02-02T17:15:28] Compared 73.847 GiB (78%) in 17.373 secs (4.251 GiB/s) 5 secs left ...
[2024-02-02T17:15:30] Compared 82.258 GiB (87%) in 18.774 secs (4.382 GiB/s) 3 secs left ...
[2024-02-02T17:15:31] Compared 88.299 GiB (93%) in 19.875 secs (4.443 GiB/s) 1 secs left ...
[2024-02-02T17:15:33] Compared 92.976 GiB (98%) in 21.838 secs (4.257 GiB/s) 0 secs left ...
[2024-02-02T17:15:33] Compared 94.824 GiB (100%) in 21.839 secs (4.342 GiB/s) done
[2024-02-02T17:15:33] Started   : Feb-02-2024, 17:15:11
[2024-02-02T17:15:33] Completed : Feb-02-2024, 17:15:33
[2024-02-02T17:15:33] Seconds   : 21.846
[2024-02-02T17:15:33] Items     : 20746
[2024-02-02T17:15:33] Item Rate : 20746 items in 21.845926 seconds (949.650729 items/sec)
[2024-02-02T17:15:33] Bytes read: 94.824 GiB (101816256512 bytes)
[2024-02-02T17:15:33] Byte Rate : 4.341 GiB/s (101816256512 bytes in 21.846 seconds)
[2024-02-02T17:15:33] Writing to output file: dcmp_differ_file.out
[2024-02-02T17:15:34] Wrote 1146 files in 1.018 seconds (1126.240 files/sec)
Number of items that have different contents: 573 (Src: 573 Dest: 573), dumped to "dcmp_differ_file.out"
[2024-02-02T17:15:34] Writing to output file: dcmp_common_file.out
[2024-02-02T17:15:34] Wrote 17660 files in 0.084 seconds (210193.624 files/sec)
Number of items that have the same content: 8830 (Src: 8830 Dest: 8830), dumped to "dcmp_common_file.out"
[2024-02-02T17:15:34] Writing to output file: dcmp_onlysrc_file.out
[2024-02-02T17:15:34] Wrote 11343 files in 0.081 seconds (139911.700 files/sec)
Number of items that exist only in source directory: N/A (Src: 11343 Dest: 0), dumped to "dcmp_onlysrc_file.out"
[2024-02-02T17:15:34] Writing to output file: dcmp_onlydest_file.out
[2024-02-02T17:15:34] Wrote 0 files in 0.039 seconds (0.000 files/sec)
Number of items that exist only in destination directory: 0 (Src: 0 Dest: 0), dumped to "dcmp_onlydest_file.out"
How to modify the users’s environment.
When users login on an frontend node using the secure shell software a shell will be started and a set of environment variables will be exported. These are defined in system profiles. Each user can add/modify his environment by using his own profiles in his $HOME directory.
In the Jülich setup there will be a separate $HOME directory for each HPC system. Which means that the environment differs between
JUPITER, JUWELS, JURECA; JUDAC; … and also the user can modify his own profiles for each system separately.
Therefore a skeleton .bash_profile and .bashrc are placed in each $HOME directory when a user is joined to any HPC system.
.bash_profile:
# **************************************************
# bash environment file in $HOME
# Please see:
# http://www.fz-juelich.de/ias/jsc/EN/Expertise/D...
# for more information and possible modifications...
# **************************************************
# Get the aliases and functions: Copied from Cent...
if [ -f ~/.bashrc ]; then
   . ~/.bashrc
fi
export PS1="[\u@\h \W]$ "
.bashrc:
# **************************************************
# bash environment file in $HOME
# Please see:
# http://www.fz-juelich.de/ias/jsc/EN/Expertise/D...
# for more information and possible modifications...
# **************************************************
# Source global definitions: Copied from CentOS 7...
if [ -f /etc/bashrc ]; then
   . /etc/bashrc
fi
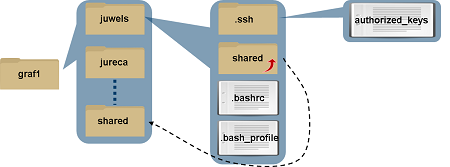
Separate $HOME directory for each HPC system
E.g. on JUDAC user graf1 will see $HOME="/p/home/jusers/graf1/JUDAC". The profiles located here were used for login.
Only the shared folder (link) points always to the same directory /p/home/jusers/graf1/shared.
Note
EXASTORE, as provider of $HOME for JUPITER, is a different cluster than the JUST system for JUDAC, JUWELS, JURECA and JUSUF. Therefore the shared folder is not the same.
Most side-dependent variables are set automatically by the jutil env init command (system profile). The user can set the
right core variables (PROJECT, ARCHIVE, …) by using
jutil env activate -p <project>
For more information look at the jutil command usage.
How to make the currently enabled budget visible
If a user has to change his budget account during a login session it might be helpful to see the currently set budget account
in his prompt to be sure to work on the correct budget.Therefore one should replace the current “export PS!=...” line in
.bash_profile by:
prompt() {
PS1="[${BUDGET_ACCOUNTS:-\u}@\h \W]\$ "
}
PROMPT_COMMAND=prompt
This results in the following behaviour:
[user1@juwels07 ~]$ jutil env activate -p chpsadm
[hpsadm@juwels07 ~]$ jutil env activate -p cslfse
[slfse@juwels07 ~]$
How can I recall migrated data?
Normally migrated files are automatically recalled from ISP-HSM tape storage when the file is accessed on the login nodes of the HPC systems (e.g. JUWELS, JURECA, …) or the Data Access System (JUDAC).
For an explicit recall the native ISP-HSM command dsmrecall is not available. Please use
tail <filename>
or:
head <filename>
to start the recall process. These commands will not change any file attribute and the migrated version of the file as well as the backup version stay valid.
Warning
It is strongly recommended NOT to use
touch <filename>
because this changes the timestamp of the file, so a new backup copy must be created and the file has to be migrated again. These are two additional processes that waste compute resources, if the file is used read only by further processing.
How can I see which data is migrated?
There are two file systems which hold migrated data: /p/arch1 and /p/arch2.
These are so called archive file systems.
In principle all data in the file systems will be migrated to ISP-HSM tape storage in tape libraries.
Data is copied to ISP backup storage prior to migration.
Data are not quoted by storage but by the number of files per group/project. This is done because UNIX is still not able to handle millions of files in a file system with an acceptable performance.
The ISP-HSM native command dsmls, which shows if a file is migrated, is not available on any HPC system (e.g. JUWELS, JURECA, …) nor on
the Data Access System (JUDAC). This command is only supported on the ISP-HSM node of the JUST storage cluster, that hosts the file systems
for the HPC systems.
However JUSUF is not open for user access.
Please use
ls -ls [mask | filename]
to list the files. Migrated files can be identified by a block count of 0 in the first column (-s option) and an arbitrary number of bytes in the sixth column (-l option).
0 -rw-r----- 1 user group 513307 Jan 22 2008 log1

0 -rw-r----- 1 user group 114 Jan 22 2008 log2

0 -rw-r----- 1 user group 273 Jan 22 2008 log3

0 -rw-r----- 1 user group 22893504 Jan 23 2008 log4
How to restore files?
All file systems except for $SCRATCH provide data protection mechanisms based on the IBM Storage Protect (ISP) and the Storage Scale (GPFS) snapshot technology.
Warning
There is currently no user-friendly GUI restore client available for the ISP backup. If you encounter a situation where the snapshot based backup is insufficient please reach out to application support
Warning
Deleted files are retained in ISP only for 30 days.
As backup frequency depends on the rate of changes in the data, a daily backup by ISP to tape for every project is not guaranteed. Therefore, an internal backup based on the snapshot feature from the file system (GPFS) is offered. The difference between the ISP backup and the snapshot based backup is that ISP acts on file changes while snapshots save the state at a certain point in time.
Right now the following snapshots are configured:
daily backup |
last three retention |
today, just after midnight |
weekly backup |
last three retention |
every Sunday, just after midnight |
monthly backup |
last three retention |
every 1st day of month, just after midnight |
The snapshots can be found in a special subdirectory of the project repository. E.g. for your files in $DATA go to
cd /p/data1/.snapshots
and list contents
/p/data1/.snapshots> ls
daily-20181129
daily-20181130
daily-20181203
weekly-20181118
weekly-20181125
weekly-20181202
monthly-20181001
monthly-20181101
monthly-20181201
In the subdirectory <type>-<YYYYMMDD> the file version which was valid at date DD.MM.YYYY can be retrieved using the
same relative path as the actual file has within the $DATA folder for that project.
Similarly for $PROJECT and $HOME, the folder paths for the snapshots are /p/project1/.snapshots and /p/home/.snapshots respectively.
For $LARGEDATA specifically, the folder path for the snapshots is /p/largedata2/<project_name>/.snapshots.
Due to the fact that the snapshot is part of the file system, the data restore can be performed on any system where it is mounted.
Note
$ARCHIVE does not provide the snapshot backups. These data are protected by ISP only.
Linux commands to manage ACLs
command to list ACLs of a file/directory:
getfacl <file/directory>
Give user john1 read and write control to file example.txt. Also give user lucy1 the right to read this file:
setfacl -m u:john1:rw example.txt

setfacl -m u:lucy1:r example.txt
# file: example.txt
# owner: smith1
# group: cjsc
user::rw-
user:john1:rw-
user:lucy1:r--
group::---
mask::rw-
other::---
remove user john1 ACLs on example.txt:
setfacl -x u:john1 example.txt
# file: example.txt
# owner: smith1
# group: cjsc
user::rw-
user:lucy1:r--
group::---
mask::rw-
other::---
Allow users from group zam change to directory share:
setfacl -m g:zam:x share/
# file: share
# owner: smith1
# group: cjsc
user::rwx
group::---
group:zam:--x
mask::rw-
other::---
remove all ACLs from directory share:
setfacl -b share
# file: share
# owner: smith1
# group: cjsc
user::rwx
group::---
other::---
Further information (e.g. set ACLs recursively, setting default ACLs, inherit ACLs, …) can be found in the manual pages.
Which files have an access control list?
The command
ls -l
will show a “+” for every file that has ACL set, eg.
drwx------+ 2 john1 cjsc 32768 Feb 21 09:25 share
How to avoid multiple SSH connections on data transfer?
When transferring multiple files, it can be problematic to use a separate SSH connection for each transfer operation. The network firewall can block a large amount of independent simultaneous SSH connections. There are different options to avoid multiple SSH connections:
Use rsync or use scp with multiple files
rsync -avhzP local_folder/ username@host:remote_folder
rsync only copies new or changed files, this will reserve transfer bandwith.
scp -r local_folder/ username@host:remote_folder
will copy local_folder recursively.
Use tar-container to transfer less files
Creating a tar file and transfer it can be much faster compared to transferring all files separately:
tar -cf tar.file local_folder
The tar file creation, transmission and extraction process can also be done on the fly:
tar -c local_folder/ | ssh username@host \
'cd remote_folder; tar -x'
Use shared SSH connection
Shared SSH connections allow usage of the same connection multiple times:
Open master connection:
ssh -M -S /tmp/ssh_mux_%h_%p_%r username@host
Reuse connection:
ssh -S /tmp/ssh_mux_%h_%p_%r username@host
A shared connection can also be used when using scp:
scp -o 'ControlPath /tmp/ssh_mux_%h_%p_%r' \
local_folder username@host:remote_folder
How to ensure correct group ID for Your project data?
In our usage model all compute and data projects get a dedicated data repository in our global parallel file systems. The files stored into this directory belongs to the project. Therefore all files and sub-directory have to belong to project’s UNIX group. To ensure that all data automatically belongs to this group the project directory has the setGID bit in place. New files will inherit the project UNIX group by default and sub-directories will get the setGID bit, too. But users can overrule this default behavior (willingly or by accident).
To fix wrong group ownership on your files use
chown :<group> <target_file>
chown :zam /p/arch1/zam/calculation/output.txt
If you have a complete directory to fix use the recursive option:
chown -R -h :zam /p/arch1/zam/calculation
Note
On $ARCHIVE the quota usage is calculated on UNIX group base. Therefore nightly a recursive chown is performed on each project directory to apply the corresponding project group.
If the setGID bit is missing on a directory use
chmod g+s <target directory>
chmod g+s /p/arch1/zam/calculation
If the setGID bit is missing in a complete directory tree, use find to fix it for all sub-directories:
find /p/arch1/zam/calculation -type d -exec chmod g+s {} \;