 |
Cube GUI User Guide
(CubeGUI 4.9.1, revision 1cb02402)
Introduction in Cube GUI and its usage
|
|
Cube GUI User Guide
(CubeGUI 4.9.1, revision 1cb02402)
Introduction in Cube GUI and its usage
|
The "Measurement" tab provides guidance to the user on measuring their application. To begin measurement, the user must first select the run they wish to perform. They can choose whether to do an initial, finetuned, custom, or detailed run. Next, the user needs to specify some presettings which are the same for all runs. This step is followed by selecting run-specific settings. Afterward, the user needs to run their application and will be offered options on how to proceed.

There are a few options that are the same for each run. These settings are specified in this section.
This combo box allows the user to specify the number of processes to be used for running the program. The value will be included as a command line argument in the mpirun or mpiexec command and will also be part of the suggested name for the experiment directory.
This combobox enables the user to specify the number of threads to be used for program execution. Upon selection, the "OMP_NUM_THREADS" variable will be exported with the corresponding value.
This line edit allows the user to specify the name of the experiment directory. The directory is where the profile.cubex file containing the measurement results will be stored after the measurement is completed.
The initial run creates the first measurement, which serves as the basis for a more accurate measurement. It is important to note that the initial run may not provide optimal results, but it is necessary to conduct it before performing a more accurate measurement.
The initial run does not require any run-specific settings.
The finetuned run is available once the first measurement of the application exists. This run employs a Filter to enhance the measurement. However, it does not improve the application itself.
In the finetuned run, the user is required to use a filter file. Please refer to the Score-P User Guide for more information on filter files. The plugin provides two options for using a filter file: using an existing filter file by specifying its path, or creating a new filter file within the plugin.

If the user chooses to use an existing filter file, a window will appear allowing them to browse the directory and select the filter file. If the user chooses to create a filter file, the plugin provides two options: creating a filter file manually or generating an initial filter file.

If the user chooses to create a filter file manually, the plugin displays a window allowing the user to create their own filter file. The plugin also provides hints on how to create the filter file.
If the user chooses to generate an initial filter file, the plugin will prompt the user to select a measurement that will serve as the basis for creating the filter. This is because the plugin utilizes Score-P's scorep-score tool. In the following step, the user can customize scorep-score's command line options.

When the user has selected a filter file in any of the described ways, the step to Run the program will be visible. Additionally, the SCOREP_FILTERING_FILE variable will be exported with the path to the selected filter file. The user will also have the option to inspect the filter.

Clicking on this button will open a window displaying the selected filter file, allowing the user to edit it.
To create the measurement, it is necessary to execute the instrumented program. The plugin provides two options for running the program: locally or by submitting a jobscript.
If the user chooses to run the program locally, the command specified in the run command box will be executed. It should be noted that the full path to the command used must be specified in the command line. Nevertheless, the plugin typically suggests this.
The plugin waits for the program to finish running, and during that time, the screen may appear frozen. Therefore, it is recommended to use the jobscript option for larger programs.
The plugin provides the option to open either a job script generated by the plugin itself, or the user's own job script.

If the user selects to open a generated job script, the plugin creates a sbatch job script containing all the necessary information specified earlier in this tab. The user can review and modify the script before submitting it to the job scheduler.
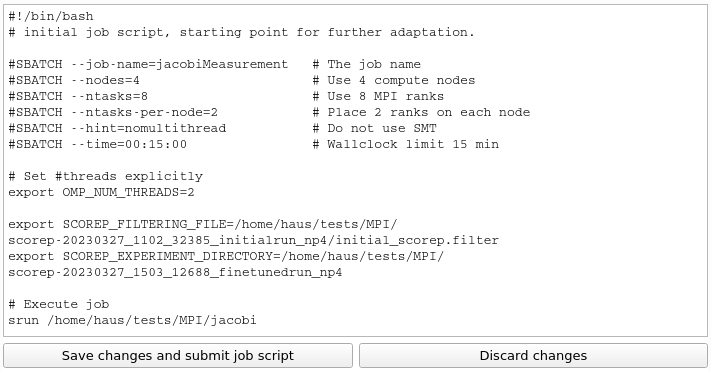
If the user selects to open their own job script, the plugin opens an edit window displaying the script. The user is asked to modify it in order to apply the required changes corresponding to the options selected earlier. The plugin provides appropriate suggestions that should be added to the job script, which could look like the following:

Once the user has made the required changes, they can save the modified script and submit it. To submit the job, the plugin uses the sbatch scheduler.
After the job is submitted, the user can wait for it to finish within the plugin or close the plugin and return later. The job is added to the list of submitted jobs, which is displayed when the plugin is started. From there, the user can easily check the status of the job and return when it is finished.
After the program has been successfully run, the user has the option to save a shell script which can be used to reconstruct the measurement they have just performed.

The user is also offered the option to view the measurement results or to perform another measurement with the same executable. If the user selects to view the measurement results, the plugin is closed and CubeGUI opens the created profile.cubex file containing the measurement profile. If the user selects to perform another measurement, all the options selected in the Measurement tab are reset, but there is no need to redo the Setup and Instrumentation steps.

To return, see Plugin "Measurement"
 |
Copyright © 1998 Forschungszentrum Jülich GmbH,
Jülich Supercomputing Centre
Copyright © 2009–2015 German Research School for Simulation Sciences GmbH, Laboratory for Parallel Programming |